Aligning HTML Elements to 3D
This article is part of a series of articles about three.js. The first article is three.js fundamentals. If you haven't read that yet and you're new to three.js you might want to consider starting there.
Sometimes you'd like to display some text in your 3D scene. You have many options each with pluses and minuses.
Use 3D text
If you look at the primitives article you'll see
TextGeometrywhich makes 3D text. This might be useful for flying logos but probably not so useful for stats, info, or labelling lots of things.Use a texture with 2D text drawn into it.
The article on using a Canvas as a texture shows using a canvas as a texture. You can draw text into a canvas and display it as a billboard. The plus here might be that the text is integrated into the 3D scene. For something like a computer terminal shown in a 3D scene this might be perfect.
Use HTML Elements and position them to match the 3D
The benefits to this approach is you can use all of HTML. Your HTML can have multiple elements. It can by styled with CSS. It can also be selected by the user as it is actual text.
This article will cover this last approach.
Let's start simple. We'll make a 3D scene with a few primitives and then add a label to each primitive. We'll start with an example from the article on responsive pages
We'll add some OrbitControls like we did in the article on lighting.
import * as THREE from '/build/three.module.js';
+import {OrbitControls} from '/examples/jsm/controls/OrbitControls.js';
const controls = new OrbitControls(camera, canvas);
controls.target.set(0, 0, 0);
controls.update();
We need to provide an HTML element to contain our label elements
<body>
-  <canvas id="c"></canvas>
+  <div id="container">
+    <canvas id="c"></canvas>
+    <div id="labels"></div>
+  </div>
</body>
By putting both the canvas and the <div id="labels"> inside a
parent container we can make them overlap with this CSS
#c {
-    width: 100%;
-    height: 100%;
+    width: 100%;  /* let our container decide our size */
+    height: 100%;
    display: block;
}
+#container {
+  position: relative;  /* makes this the origin of its children */
+  width: 100%;
+  height: 100%;
+  overflow: hidden;
+}
+#labels {
+  position: absolute;  /* let us position ourself inside the container */
+  left: 0;             /* make our position the top left of the container */
+  top: 0;
+  color: white;
+}
let's also add some CSS for the labels themselves
#labels>div {
  position: absolute;  /* let us position them inside the container */
  left: 0;             /* make their default position the top left of the container */
  top: 0;
  cursor: pointer;     /* change the cursor to a hand when over us */
  font-size: large;
  user-select: none;   /* don't let the text get selected */
  text-shadow:         /* create a black outline */
    -1px -1px 0 #000,
     0   -1px 0 #000,
     1px -1px 0 #000,
     1px  0   0 #000,
     1px  1px 0 #000,
     0    1px 0 #000,
    -1px  1px 0 #000,
    -1px  0   0 #000;
}
#labels>div:hover {
  color: red;
}
Now into our code we don't have to add too much. We had a function
makeInstance that we used to generate cubes. Let's make it
so it also adds a label element.
+const labelContainerElem = document.querySelector('#labels');

-function makeInstance(geometry, color, x) {
+function makeInstance(geometry, color, x, name) {
  const material = new THREE.MeshPhongMaterial({color});

  const cube = new THREE.Mesh(geometry, material);
  scene.add(cube);

  cube.position.x = x;

+  const elem = document.createElement('div');
+  elem.textContent = name;
+  labelContainerElem.appendChild(elem);

-  return cube;
+  return {cube, elem};
}
As you can see we're adding a <div> to the container, one for each cube. We're
also returning an object with both the cube and the elem for the label.
Calling it we need to provide a name for each
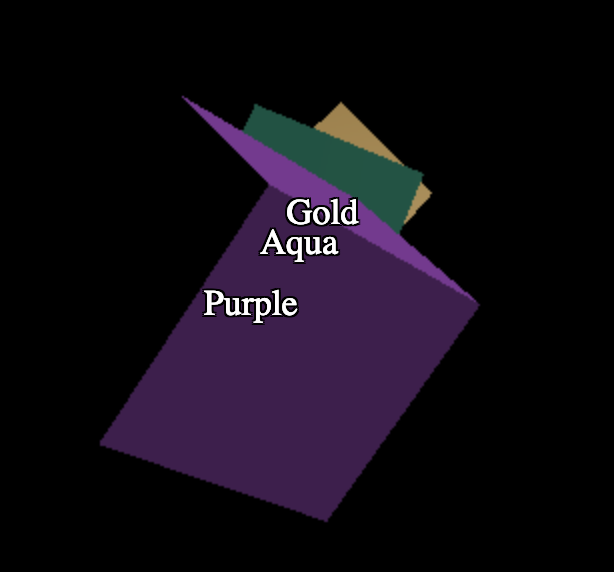
const cubes = [
-  makeInstance(geometry, 0x44aa88,  0),
-  makeInstance(geometry, 0x8844aa, -2),
-  makeInstance(geometry, 0xaa8844,  2),
+  makeInstance(geometry, 0x44aa88,  0, 'Aqua'),
+  makeInstance(geometry, 0x8844aa, -2, 'Purple'),
+  makeInstance(geometry, 0xaa8844,  2, 'Gold'),
];
What remains is positioning the label elements at render time
const tempV = new THREE.Vector3();

...

-cubes.forEach((cube, ndx) => {
+cubes.forEach((cubeInfo, ndx) => {
+  const {cube, elem} = cubeInfo;
  const speed = 1 + ndx * .1;
  const rot = time * speed;
  cube.rotation.x = rot;
  cube.rotation.y = rot;

+  // get the position of the center of the cube
+  cube.updateWorldMatrix(true, false);
+  cube.getWorldPosition(tempV);
+
+  // get the normalized screen coordinate of that position
+  // x and y will be in the -1 to +1 range with x = -1 being
+  // on the left and y = -1 being on the bottom
+  tempV.project(camera);
+
+  // convert the normalized position to CSS coordinates
+  const x = (tempV.x *  .5 + .5) * canvas.clientWidth;
+  const y = (tempV.y * -.5 + .5) * canvas.clientHeight;
+
+  // move the elem to that position
+  elem.style.transform = `translate(-50%, -50%) translate(${x}px,${y}px)`;
});
And with that we have labels aligned to their corresponding objects.
There are a couple of issues we probably want to deal with.
One is that if we rotate the objects so they overlap all the labels overlap as well.
Another is that if we zoom way out so that the objects go outside the frustum the labels will still appear.
A possible solution to the problem of overlapping objects is to use
the picking code from the article on picking.
We'll pass in the position of the object on the screen and then
ask the RayCaster to tell us which objects were intersected.
If our object is not the first one then we are not in the front.
const tempV = new THREE.Vector3();
+const raycaster = new THREE.Raycaster();

...

cubes.forEach((cubeInfo, ndx) => {
  const {cube, elem} = cubeInfo;
  const speed = 1 + ndx * .1;
  const rot = time * speed;
  cube.rotation.x = rot;
  cube.rotation.y = rot;

  // get the position of the center of the cube
  cube.updateWorldMatrix(true, false);
  cube.getWorldPosition(tempV);

  // get the normalized screen coordinate of that position
  // x and y will be in the -1 to +1 range with x = -1 being
  // on the left and y = -1 being on the bottom
  tempV.project(camera);

+  // ask the raycaster for all the objects that intersect
+  // from the eye toward this object's position
+  raycaster.setFromCamera(tempV, camera);
+  const intersectedObjects = raycaster.intersectObjects(scene.children);
+  // We're visible if the first intersection is this object.
+  const show = intersectedObjects.length && cube === intersectedObjects[0].object;
+
+  if (!show) {
+    // hide the label
+    elem.style.display = 'none';
+  } else {
+    // un-hide the label
+    elem.style.display = '';

    // convert the normalized position to CSS coordinates
    const x = (tempV.x *  .5 + .5) * canvas.clientWidth;
    const y = (tempV.y * -.5 + .5) * canvas.clientHeight;

    // move the elem to that position
    elem.style.transform = `translate(-50%, -50%) translate(${x}px,${y}px)`;
+  }
});
This handles overlapping.
To handle going outside the frustum we can add this check if the origin of
the object is outside the frustum by checking tempV.z
-  if (!show) {
+  if (!show || Math.abs(tempV.z) > 1) {
    // hide the label
    elem.style.display = 'none';
This kind of works because the normalized coordinates we computed include a z
value that goes from -1 when at the near part of our camera frustum to +1 when
at the far part of our camera frustum.
For the frustum check, the solution above fails as we're only checking the origin of the object. For a large object. That origin might go outside the frustum but half of the object might still be in the frustum.
A more correct solution would be to check if the object itself is in the frustum or not. Unfortunate that check is slow. For 3 cubes it will not be a problem but for many objects it might be.
Three.js provides some functions to check if an object's bounding sphere is in a frustum
// at init time
const frustum = new THREE.Frustum();
const viewProjection = new THREE.Matrix4();

...

// before checking
camera.updateMatrix();
camera.updateMatrixWorld();
camera.matrixWorldInverse.copy(camera.matrixWorld).invert();

...

// then for each mesh
someMesh.updateMatrix();
someMesh.updateMatrixWorld();

viewProjection.multiplyMatrices(
    camera.projectionMatrix, camera.matrixWorldInverse);
frustum.setFromProjectionMatrix(viewProjection);
const inFrustum = frustum.contains(someMesh));
Our current overlapping solution has similar issues. Picking is slow. We could use gpu based picking like we covered in the picking article but that is also not free. Which solution you chose depends on your needs.
Another issue is the order the labels appear. If we change the code to have longer labels
const cubes = [
-  makeInstance(geometry, 0x44aa88,  0, 'Aqua'),
-  makeInstance(geometry, 0x8844aa, -2, 'Purple'),
-  makeInstance(geometry, 0xaa8844,  2, 'Gold'),
+  makeInstance(geometry, 0x44aa88,  0, 'Aqua Colored Box'),
+  makeInstance(geometry, 0x8844aa, -2, 'Purple Colored Box'),
+  makeInstance(geometry, 0xaa8844,  2, 'Gold Colored Box'),
];
and set the CSS so these don't wrap
#labels>div {
+  white-space: nowrap;
Then we can run into this issue

You can see above the purple box is in the back but its label is in front of the aqua box.
We can fix this by setting the zIndex of each element. The projected position has a z value
that goes from -1 in front to positive 1 in back. zIndex is required to be an integer and goes the
opposite direction meaning for zIndex greater values are in front so the following code should work.
// convert the normalized position to CSS coordinates
const x = (tempV.x *  .5 + .5) * canvas.clientWidth;
const y = (tempV.y * -.5 + .5) * canvas.clientHeight;

// move the elem to that position
elem.style.transform = `translate(-50%, -50%) translate(${x}px,${y}px)`;

+// set the zIndex for sorting
+elem.style.zIndex = (-tempV.z * .5 + .5) * 100000 | 0;
Because of the way the projected z value works we need to pick a large number to spread out the values
otherwise many will have the same value. To make sure the labels don't overlap with other parts of
the page we can tell the browser to create a new stacking context
by setting the z-index of the container of the labels
#labels {
  position: absolute;  /* let us position ourself inside the container */
+  z-index: 0;          /* make a new stacking context so children don't sort with rest of page */
  left: 0;             /* make our position the top left of the container */
  top: 0;
  color: white;
  z-index: 0;
}
and now the labels should always be in the correct order.
While we're at it let's do one more example to show one more issue. Let's draw a globe like Google Maps and label the countries.
I found this data which contains the borders of countries. It's licensed as CC-BY-SA.
I wrote some code to load the data, and generate country outlines and some JSON data with the names of the countries and their locations.
The JSON data is an array of entries something like this
[
  {
    "name": "Algeria",
    "min": [
      -8.667223,
      18.976387
    ],
    "max": [
      11.986475,
      37.091385
    ],
    "area": 238174,
    "lat": 28.163,
    "lon": 2.632,
    "population": {
      "2005": 32854159
    }
  },
  ...
where min, max, lat, lon, are all in latitude and longitude degrees.
Let's load it up. The code is based on the examples from optimizing lots of objects though we are not drawing lots of objects we'll be using the same solutions for rendering on demand.
The first thing is to make a sphere and use the outline texture.
{
  const loader = new THREE.TextureLoader();
  const texture = loader.load('resources/data/world/country-outlines-4k.png', render);
  const geometry = new THREE.SphereGeometry(1, 64, 32);
  const material = new THREE.MeshBasicMaterial({map: texture});
  scene.add(new THREE.Mesh(geometry, material));
}
Then let's load the JSON file by first making a loader
async function loadJSON(url) {
  const req = await fetch(url);
  return req.json();
}
and then calling it
let countryInfos;
async function loadCountryData() {
  countryInfos = await loadJSON('resources/data/world/country-info.json');
     ...
  }
  requestRenderIfNotRequested();
}
loadCountryData();
Now let's use that data to generate and place the labels.
In the article on optimizing lots of objects we had setup a small scene graph of helper objects to make it easy to compute latitude and longitude positions on our globe. See that article for an explanation of how they work.
const lonFudge = Math.PI * 1.5;
const latFudge = Math.PI;
// these helpers will make it easy to position the boxes
// We can rotate the lon helper on its Y axis to the longitude
const lonHelper = new THREE.Object3D();
// We rotate the latHelper on its X axis to the latitude
const latHelper = new THREE.Object3D();
lonHelper.add(latHelper);
// The position helper moves the object to the edge of the sphere
const positionHelper = new THREE.Object3D();
positionHelper.position.z = 1;
latHelper.add(positionHelper);
We'll use that to compute a position for each label
const labelParentElem = document.querySelector('#labels');
for (const countryInfo of countryInfos) {
  const {lat, lon, name} = countryInfo;

  // adjust the helpers to point to the latitude and longitude
  lonHelper.rotation.y = THREE.MathUtils.degToRad(lon) + lonFudge;
  latHelper.rotation.x = THREE.MathUtils.degToRad(lat) + latFudge;

  // get the position of the lat/lon
  positionHelper.updateWorldMatrix(true, false);
  const position = new THREE.Vector3();
  positionHelper.getWorldPosition(position);
  countryInfo.position = position;

  // add an element for each country
  const elem = document.createElement('div');
  elem.textContent = name;
  labelParentElem.appendChild(elem);
  countryInfo.elem = elem;
The code above looks very similar to the code we wrote for making cube labels
making an element per label. When we're done we have an array, countryInfos,
with one entry for each country to which we've added an elem property for
the label element for that country and a position with its position on the
globe.
Just like we did for the cubes we need to update the position of the labels and render time.
const tempV = new THREE.Vector3();

function updateLabels() {
  // exit if we have not yet loaded the JSON file
  if (!countryInfos) {
    return;
  }

  for (const countryInfo of countryInfos) {
    const {position, elem} = countryInfo;

    // get the normalized screen coordinate of that position
    // x and y will be in the -1 to +1 range with x = -1 being
    // on the left and y = -1 being on the bottom
    tempV.copy(position);
    tempV.project(camera);

    // convert the normalized position to CSS coordinates
    const x = (tempV.x *  .5 + .5) * canvas.clientWidth;
    const y = (tempV.y * -.5 + .5) * canvas.clientHeight;

    // move the elem to that position
    elem.style.transform = `translate(-50%, -50%) translate(${x}px,${y}px)`;

    // set the zIndex for sorting
    elem.style.zIndex = (-tempV.z * .5 + .5) * 100000 | 0;
  }
}
You can see the code above is substantially similar to the cube example before. The only major difference is we pre-computed the label positions at init time. We can do this because the globe never moves. Only our camera moves.
Lastly we need to call updateLabels in our render loop
function render() {
  renderRequested = false;

  if (resizeRendererToDisplaySize(renderer)) {
    const canvas = renderer.domElement;
    camera.aspect = canvas.clientWidth / canvas.clientHeight;
    camera.updateProjectionMatrix();
  }

  controls.update();

+  updateLabels();

  renderer.render(scene, camera);
}
And this is what we get
That is way too many labels!
We have 2 problems.
Labels facing away from us are showing up.
There are too many labels.
For issue #1 we can't really use the RayCaster like we did above as there is
nothing to intersect except the sphere. Instead what we can do is check if that
particular country is facing away from us or not. This works because the label
positions are around a sphere. In fact we're using a unit sphere, a sphere with
a radius of 1.0. That means the positions are already unit directions making
the math relatively easy.
const tempV = new THREE.Vector3();
+const cameraToPoint = new THREE.Vector3();
+const cameraPosition = new THREE.Vector3();
+const normalMatrix = new THREE.Matrix3();

function updateLabels() {
  // exit if we have not yet loaded the JSON file
  if (!countryInfos) {
    return;
  }

+  const minVisibleDot = 0.2;
+  // get a matrix that represents a relative orientation of the camera
+  normalMatrix.getNormalMatrix(camera.matrixWorldInverse);
+  // get the camera's position
+  camera.getWorldPosition(cameraPosition);
  for (const countryInfo of countryInfos) {
    const {position, elem} = countryInfo;

+    // Orient the position based on the camera's orientation.
+    // Since the sphere is at the origin and the sphere is a unit sphere
+    // this gives us a camera relative direction vector for the position.
+    tempV.copy(position);
+    tempV.applyMatrix3(normalMatrix);
+
+    // compute the direction to this position from the camera
+    cameraToPoint.copy(position);
+    cameraToPoint.applyMatrix4(camera.matrixWorldInverse).normalize();
+
+    // get the dot product of camera relative direction to this position
+    // on the globe with the direction from the camera to that point.
+    // 1 = facing directly towards the camera
+    // 0 = exactly on tangent of the sphere from the camera
+    // < 0 = facing away
+    const dot = tempV.dot(cameraToPoint);
+
+    // if the orientation is not facing us hide it.
+    if (dot < minVisibleDot) {
+      elem.style.display = 'none';
+      continue;
+    }
+
+    // restore the element to its default display style
+    elem.style.display = '';

    // get the normalized screen coordinate of that position
    // x and y will be in the -1 to +1 range with x = -1 being
    // on the left and y = -1 being on the bottom
    tempV.copy(position);
    tempV.project(camera);

    // convert the normalized position to CSS coordinates
    const x = (tempV.x *  .5 + .5) * canvas.clientWidth;
    const y = (tempV.y * -.5 + .5) * canvas.clientHeight;

    // move the elem to that position
    countryInfo.elem.style.transform = `translate(-50%, -50%) translate(${x}px,${y}px)`;

    // set the zIndex for sorting
    elem.style.zIndex = (-tempV.z * .5 + .5) * 100000 | 0;
  }
}
Above we use the positions as a direction and get that direction relative to the camera. Then we get the camera relative direction from the camera to that position on the globe and take the dot product. The dot product returns the cosine of the angle between the to vectors. This gives us a value from -1 to +1 where -1 means the label is facing the camera, 0 means the label is directly on the edge of the sphere relative to the camera, and anything greater than zero is behind. We then use that value to show or hide the element.
In the diagram above we can see the dot product of the direction the label is facing to direction from the camera to that position. If you rotate the direction you'll see the dot product is -1.0 when the direction is directly facing the camera, it's 0.0 when exactly on the tangent of the sphere relative to the camera or to put it another way it's 0 when the 2 vectors are perpendicular to each other, 90 degrees It's greater than zero with the label is behind the sphere.
For issue #2, too many labels we need some way to decide which labels to show. One way would be to only show labels for large countries. The data we're loading contains min and max values for the area a country covers. From that we can compute an area and then use that area to decide whether or not to display the country.
At init time let's compute the area
const labelParentElem = document.querySelector('#labels');
for (const countryInfo of countryInfos) {
  const {lat, lon, min, max, name} = countryInfo;

  // adjust the helpers to point to the latitude and longitude
  lonHelper.rotation.y = THREE.MathUtils.degToRad(lon) + lonFudge;
  latHelper.rotation.x = THREE.MathUtils.degToRad(lat) + latFudge;

  // get the position of the lat/lon
  positionHelper.updateWorldMatrix(true, false);
  const position = new THREE.Vector3();
  positionHelper.getWorldPosition(position);
  countryInfo.position = position;

+  // compute the area for each country
+  const width = max[0] - min[0];
+  const height = max[1] - min[1];
+  const area = width * height;
+  countryInfo.area = area;

  // add an element for each country
  const elem = document.createElement('div');
  elem.textContent = name;
  labelParentElem.appendChild(elem);
  countryInfo.elem = elem;
}
Then at render time let's use the area to decide to display the label or not
+const large = 20 * 20;
const maxVisibleDot = 0.2;
// get a matrix that represents a relative orientation of the camera
normalMatrix.getNormalMatrix(camera.matrixWorldInverse);
// get the camera's position
camera.getWorldPosition(cameraPosition);
for (const countryInfo of countryInfos) {
-  const {position, elem} = countryInfo;
+  const {position, elem, area} = countryInfo;
+  // large enough?
+  if (area < large) {
+    elem.style.display = 'none';
+    continue;
+  }

  ...
Finally, since I'm not sure what good values are for these settings lets add a GUI so we can play with them
import * as THREE from '/build/three.module.js';
import {OrbitControls} from '/examples/jsm/controls/OrbitControls.js';
+import {GUI} from '/examples/jsm/libs/lil-gui.module.min.js';
+const settings = {
+  minArea: 20,
+  maxVisibleDot: -0.2,
+};
+const gui = new GUI({width: 300});
+gui.add(settings, 'minArea', 0, 50).onChange(requestRenderIfNotRequested);
+gui.add(settings, 'maxVisibleDot', -1, 1, 0.01).onChange(requestRenderIfNotRequested);

function updateLabels() {
  if (!countryInfos) {
    return;
  }

-  const large = 20 * 20;
-  const maxVisibleDot = -0.2;
+  const large = settings.minArea * settings.minArea;
  // get a matrix that represents a relative orientation of the camera
  normalMatrix.getNormalMatrix(camera.matrixWorldInverse);
  // get the camera's position
  camera.getWorldPosition(cameraPosition);
  for (const countryInfo of countryInfos) {

    ...

    // if the orientation is not facing us hide it.
-    if (dot > maxVisibleDot) {
+    if (dot > settings.maxVisibleDot) {
      elem.style.display = 'none';
      continue;
    }
and here's the result
You can see as you rotate the earth labels that go behind disappear.
Adjust the minVisibleDot to see the cutoff change.
You can also adjust the minArea value to see larger or smaller countries
appear.
The more I worked on this the more I realized just how much work is put into Google Maps. They have also have to decide which labels to show. I'm pretty sure they use all kinds of criteria. For example your current location, your default language setting, your account settings if you have an account, they probably use population or popularity, they might give priority to the countries in the center of the view, etc ... Lots to think about.
In any case I hope these examples gave you some idea of how to align HTML elements with your 3D. A few things I might change.
Next up let's make it so you can pick and highlight a country.