のビルボード
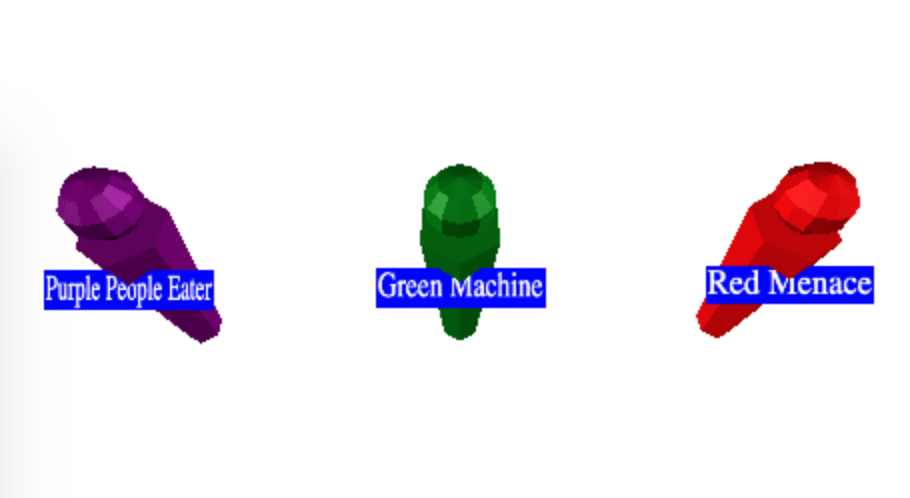
前回のページでは CanvasTextureを使ってラベルとバッジを作りました。バッジなどが常にカメラの方向を向いて文字が読める状態になっているという効果が欲しい時があります(訳註:ビルボード効果と言います)。Three.jsはSpriteとSpriteMaterial を使ってビルボード効果を実現できます。
In a previous article we used a CanvasTexture
to make labels / badges on characters. Sometimes we'd like to make labels or
other things that always face the camera. Three.js provides the Sprite and
SpriteMaterial to make this happen.
この記事からサンプルを拝借してSpriteとSpriteMaterialを使ってみましょう。
function makePerson(x, labelWidth, size, name, color) {
  const canvas = makeLabelCanvas(labelWidth, size, name);
  const texture = new THREE.CanvasTexture(canvas);
  // because our canvas is likely not a power of 2
  // in both dimensions set the filtering appropriately.
  texture.minFilter = THREE.LinearFilter;
  texture.wrapS = THREE.ClampToEdgeWrapping;
  texture.wrapT = THREE.ClampToEdgeWrapping;

-  const labelMaterial = new THREE.MeshBasicMaterial({
+  const labelMaterial = new THREE.SpriteMaterial({
    map: texture,
-    side: THREE.DoubleSide,
    transparent: true,
  });

  const root = new THREE.Object3D();
  root.position.x = x;

  const body = new THREE.Mesh(bodyGeometry, bodyMaterial);
  root.add(body);
  body.position.y = bodyHeight / 2;

  const head = new THREE.Mesh(headGeometry, bodyMaterial);
  root.add(head);
  head.position.y = bodyHeight + headRadius * 1.1;

-  const label = new THREE.Mesh(labelGeometry, labelMaterial);
+  const label = new THREE.Sprite(labelMaterial);
  root.add(label);
  label.position.y = bodyHeight * 4 / 5;
  label.position.z = bodyRadiusTop * 1.01;
はい、常にラベルがカメラの方を向くようになりました。
しかし角度によってはラベルがオブジェクトに食い込んでしまうことがあります。
ラベルの位置を動かしましょう。
+// if units are meters then 0.01 here makes size
+// of the label into centimeters.
+const labelBaseScale = 0.01;
const label = new THREE.Sprite(labelMaterial);
root.add(label);
-label.position.y = bodyHeight * 4 / 5;
-label.position.z = bodyRadiusTop * 1.01;
+label.position.y = head.position.y + headRadius + size * labelBaseScale;

-// if units are meters then 0.01 here makes size
-// of the label into centimeters.
-const labelBaseScale = 0.01;
label.scale.x = canvas.width  * labelBaseScale;
label.scale.y = canvas.height * labelBaseScale;
ビルボード効果を使ってファケード(訳註:ハリボテのようなもの)を作ることもできます。
つまり3Dオブジェクトは重いので3Dオブジェクトを描画する代わりに同じ絵を描いた板を用意するということです。
さっそくやってみます。たくさんの木があるシーンを作ってみます。1つの木はシリンダーとコーンでできています。
まずはファケードを使わずに単純に3Dオブジェクトを並べてみます。
const trunkRadius = .2;
const trunkHeight = 1;
const trunkRadialSegments = 12;
const trunkGeometry = new THREE.CylinderGeometry(
    trunkRadius, trunkRadius, trunkHeight, trunkRadialSegments);

const topRadius = trunkRadius * 4;
const topHeight = trunkHeight * 2;
const topSegments = 12;
const topGeometry = new THREE.ConeGeometry(
    topRadius, topHeight, topSegments);

const trunkMaterial = new THREE.MeshPhongMaterial({color: 'brown'});
const topMaterial = new THREE.MeshPhongMaterial({color: 'green'});
草の部分と幹の部分をそれぞれMeshで作り親オブジェクトObject3Dに加えます。
function makeTree(x, z) {
  const root = new THREE.Object3D();
  const trunk = new THREE.Mesh(trunkGeometry, trunkMaterial);
  trunk.position.y = trunkHeight / 2;
  root.add(trunk);

  const top = new THREE.Mesh(topGeometry, topMaterial);
  top.position.y = trunkHeight + topHeight / 2;
  root.add(top);

  root.position.set(x, 0, z);
  scene.add(root);

  return root;
}
たくさん作ってみましょう。
for (let z = -50; z <= 50; z += 10) {
  for (let x = -50; x <= 50; x += 10) {
    makeTree(x, z);
  }
}
地面も一応作ります。
// add ground
{
  const size = 400;
  const geometry = new THREE.PlaneGeometry(size, size);
  const material = new THREE.MeshPhongMaterial({color: 'gray'});
  const mesh = new THREE.Mesh(geometry, material);
  mesh.rotation.x = Math.PI * -0.5;
  scene.add(mesh);
}
空の色は青にします。
const scene = new THREE.Scene();
-scene.background = new THREE.Color('white');
+scene.background = new THREE.Color('lightblue');
はい、木がたくさんできました。
121個の木があります。1つにつき12ポリゴンのコーンと48ポリゴンのシリンダーがあるので1つの木は60ポリゴンです。 これが121個あるので7260ポリゴンです。このシンプルな木ならそれほど問題ありませんが、リアルな木を作ろうとしたら1つの木につき1000から3000のポリゴンがあるのが普通です。ということは121個表示するには36万3千ポリゴン必要です。木を表示するだけで動作が重くなるかもしれません。
そこでファケードを使ってポリゴン数を落とします。
ペイントソフトで描いた絵をPlaneにはってもいいのですがここは学んだことを使いましょう。
RenderTargetを使ってThree.js内で絵を描き、Planeに貼ってみます。
この記事が参考になります。
function frameArea(sizeToFitOnScreen, boxSize, boxCenter, camera) {
  const halfSizeToFitOnScreen = sizeToFitOnScreen * 0.5;
  const halfFovY = THREE.MathUtils.degToRad(camera.fov * .5);
  const distance = halfSizeToFitOnScreen / Math.tan(halfFovY);

  camera.position.copy(boxCenter);
  camera.position.z += distance;

  // pick some near and far values for the frustum that
  // will contain the box.
  camera.near = boxSize / 100;
  camera.far = boxSize * 100;

  camera.updateProjectionMatrix();
}

function makeSpriteTexture(textureSize, obj) {
  const rt = new THREE.WebGLRenderTarget(textureSize, textureSize);

  const aspect = 1;  // because the render target is square
  const camera = new THREE.PerspectiveCamera(fov, aspect, near, far);

  scene.add(obj);

  // compute the box that contains obj
  const box = new THREE.Box3().setFromObject(obj);

  const boxSize = box.getSize(new THREE.Vector3());
  const boxCenter = box.getCenter(new THREE.Vector3());

  // set the camera to frame the box
  const fudge = 1.1;
  const size = Math.max(...boxSize.toArray()) * fudge;
  frameArea(size, size, boxCenter, camera);

  renderer.autoClear = false;
  renderer.setRenderTarget(rt);
  renderer.render(scene, camera);
  renderer.setRenderTarget(null);
  renderer.autoClear = true;

  scene.remove(obj);

  return {
    position: boxCenter.multiplyScalar(fudge),
    scale: size,
    texture: rt.texture,
  };
}
まずフィールドオブビュー(fov)を設定しています。カメラの視野範囲におさまる木をこの記事と同じ方法で計算しています。
さらにframeAreaを使っています。これは木を表示する最も近いカメラの位置を計算してカメラに設定しています。仮想的なスタジオで木の写真をとっているような状態です。
レンダーターゲットに木がおさまるようにサイズを1.1倍(fudge倍)しています。ここで注意が必要なのはカメラで撮影した木の映像がレンダーターゲットをはみ出したり逆に小さすぎたりする場合です。もちろんこうした状態は事前に精緻な計算をしておけば良いのですがここではfudgeで調整しています。
木の撮影ができたのでレンダーターゲットにレンダリングして元の3Dオブジェクトは消しておきます。
シーンにはライトだけがある状態です。
const scene = new THREE.Scene();
-scene.background = new THREE.Color('lightblue');
最後にテクスチャを作って位置とサイズを調整します。
// make billboard texture
const tree = makeTree(0, 0);
const facadeSize = 64;
const treeSpriteInfo = makeSpriteTexture(facadeSize, tree);
これで重い3Dモデルの木の代わりにファケードを使った木ができました。
+function makeSprite(spriteInfo, x, z) {
+  const {texture, offset, scale} = spriteInfo;
+  const mat = new THREE.SpriteMaterial({
+    map: texture,
+    transparent: true,
+  });
+  const sprite = new THREE.Sprite(mat);
+  scene.add(sprite);
+  sprite.position.set(
+      offset.x + x,
+      offset.y,
+      offset.z + z);
+  sprite.scale.set(scale, scale, scale);
+}

for (let z = -50; z <= 50; z += 10) {
  for (let x = -50; x <= 50; x += 10) {
-    makeTree(x, z);
+    makeSprite(treeSpriteInfo, x, z);
  }
}
背景も変えてみます。
scene.background = new THREE.Color('lightblue');
完成です。
3Dモデルと違って近づくとハリボテであることがバレてしまいます。今回は64x64ピクセルで作りましたがもちろん高解像にすることもできます。しかしそれでも3Dモデルのように近づいてもエッジが綺麗というわけにはいかないので、通常はカメラが近づくことがない遠く離れた木や山に使います。
他にはカメラの向きを変えても同じように見える問題がありますが、これは8個のファケードを用意して別の角度から見たときに別のファケードが見えるようにすればいいでしょう。