圧縮テクスチャのピッキングとカラー
この記事はThree.jsでHTML要素を3Dに揃えるの続きです。 まだ読んでいない人はそちらから読んでみて下さい。
Three.jsを使う時には、クリエイティブな解決策を考えなければならない事もあります。 これが素晴らしい解決策かわかりませんが、共有して何か解決策の提案があるか見てみようと思いました。
前回の記事では3Dの地球儀の周りに国名を表示しました。 ユーザーに国を選択させて、その国の選択内容を表示させるにはどうすれば良いでしょうか?
最初に思いつくのは国ごとにジオメトリを生成する事です。 以前取り上げたピッキングを使った解決策があります。 国ごとに3Dジオメトリを作ります。 ユーザーが国のメッシュをクリックすると、どの国がクリックされたのか分かります。
この解決策を確認するために前回の記事のアウトライン生成に使った同じデータを使用し、全ての国の3Dメッシュを生成してみました。 その結果、15.5MBのバイナリGLTF(.glb)ファイルができました。 15.5MBをダウンロードさせるのは、私にはやりすぎのように思えます。
データを圧縮する方法はたくさんあります。 1つ目はアウトラインの解像度を下げるアルゴリズムを適用する事です。 その解決策を追求する時間を割いていませんでした。 アメリカの国境にとっては大勝利でしょうね。 カナダの国境はおそらくもっと少ないです。
別の解決策としては、実際のデータ圧縮だけを使用する方法もあります。 例えばファイルを圧縮すると11MBになりました。 30%減ですが、間違いなく物足りないです。
全てのデータを32ビットのfloat値ではなく、16ビットの範囲内の値として格納できます。 もしくはdraco compressionのようなものを使う事もできるし、それだけで充分かもしれません。 私は確認してないですが、ぜひご自身で確認して結果がどうなったか教えて下さい😅
私の場合はピッキングの記事の最後に取り上げたGPUピッキングの解決策について考えてみました。 この解決策では、メッシュのIDを表すユニークなカラーで全てのメッシュを描画しました。 全てのメッシュを描画し、クリックしてカラーを確認しました。
そこからインスピレーションを得て、国の配列の中でそれぞれの国のカラーがインデックス番号になり、国の地図を事前に生成できました。 そうすれば、GPUピッキング技術と似たように使う事ができます。 この圧縮テクスチャ(インデックステクスチャ)を使って地球儀を画面外に描画します。 ユーザーがクリックしたピクセルのカラーを見ると国のIDが分かります。
そこでこのようなテクスチャを生成するコードを書いてみました。
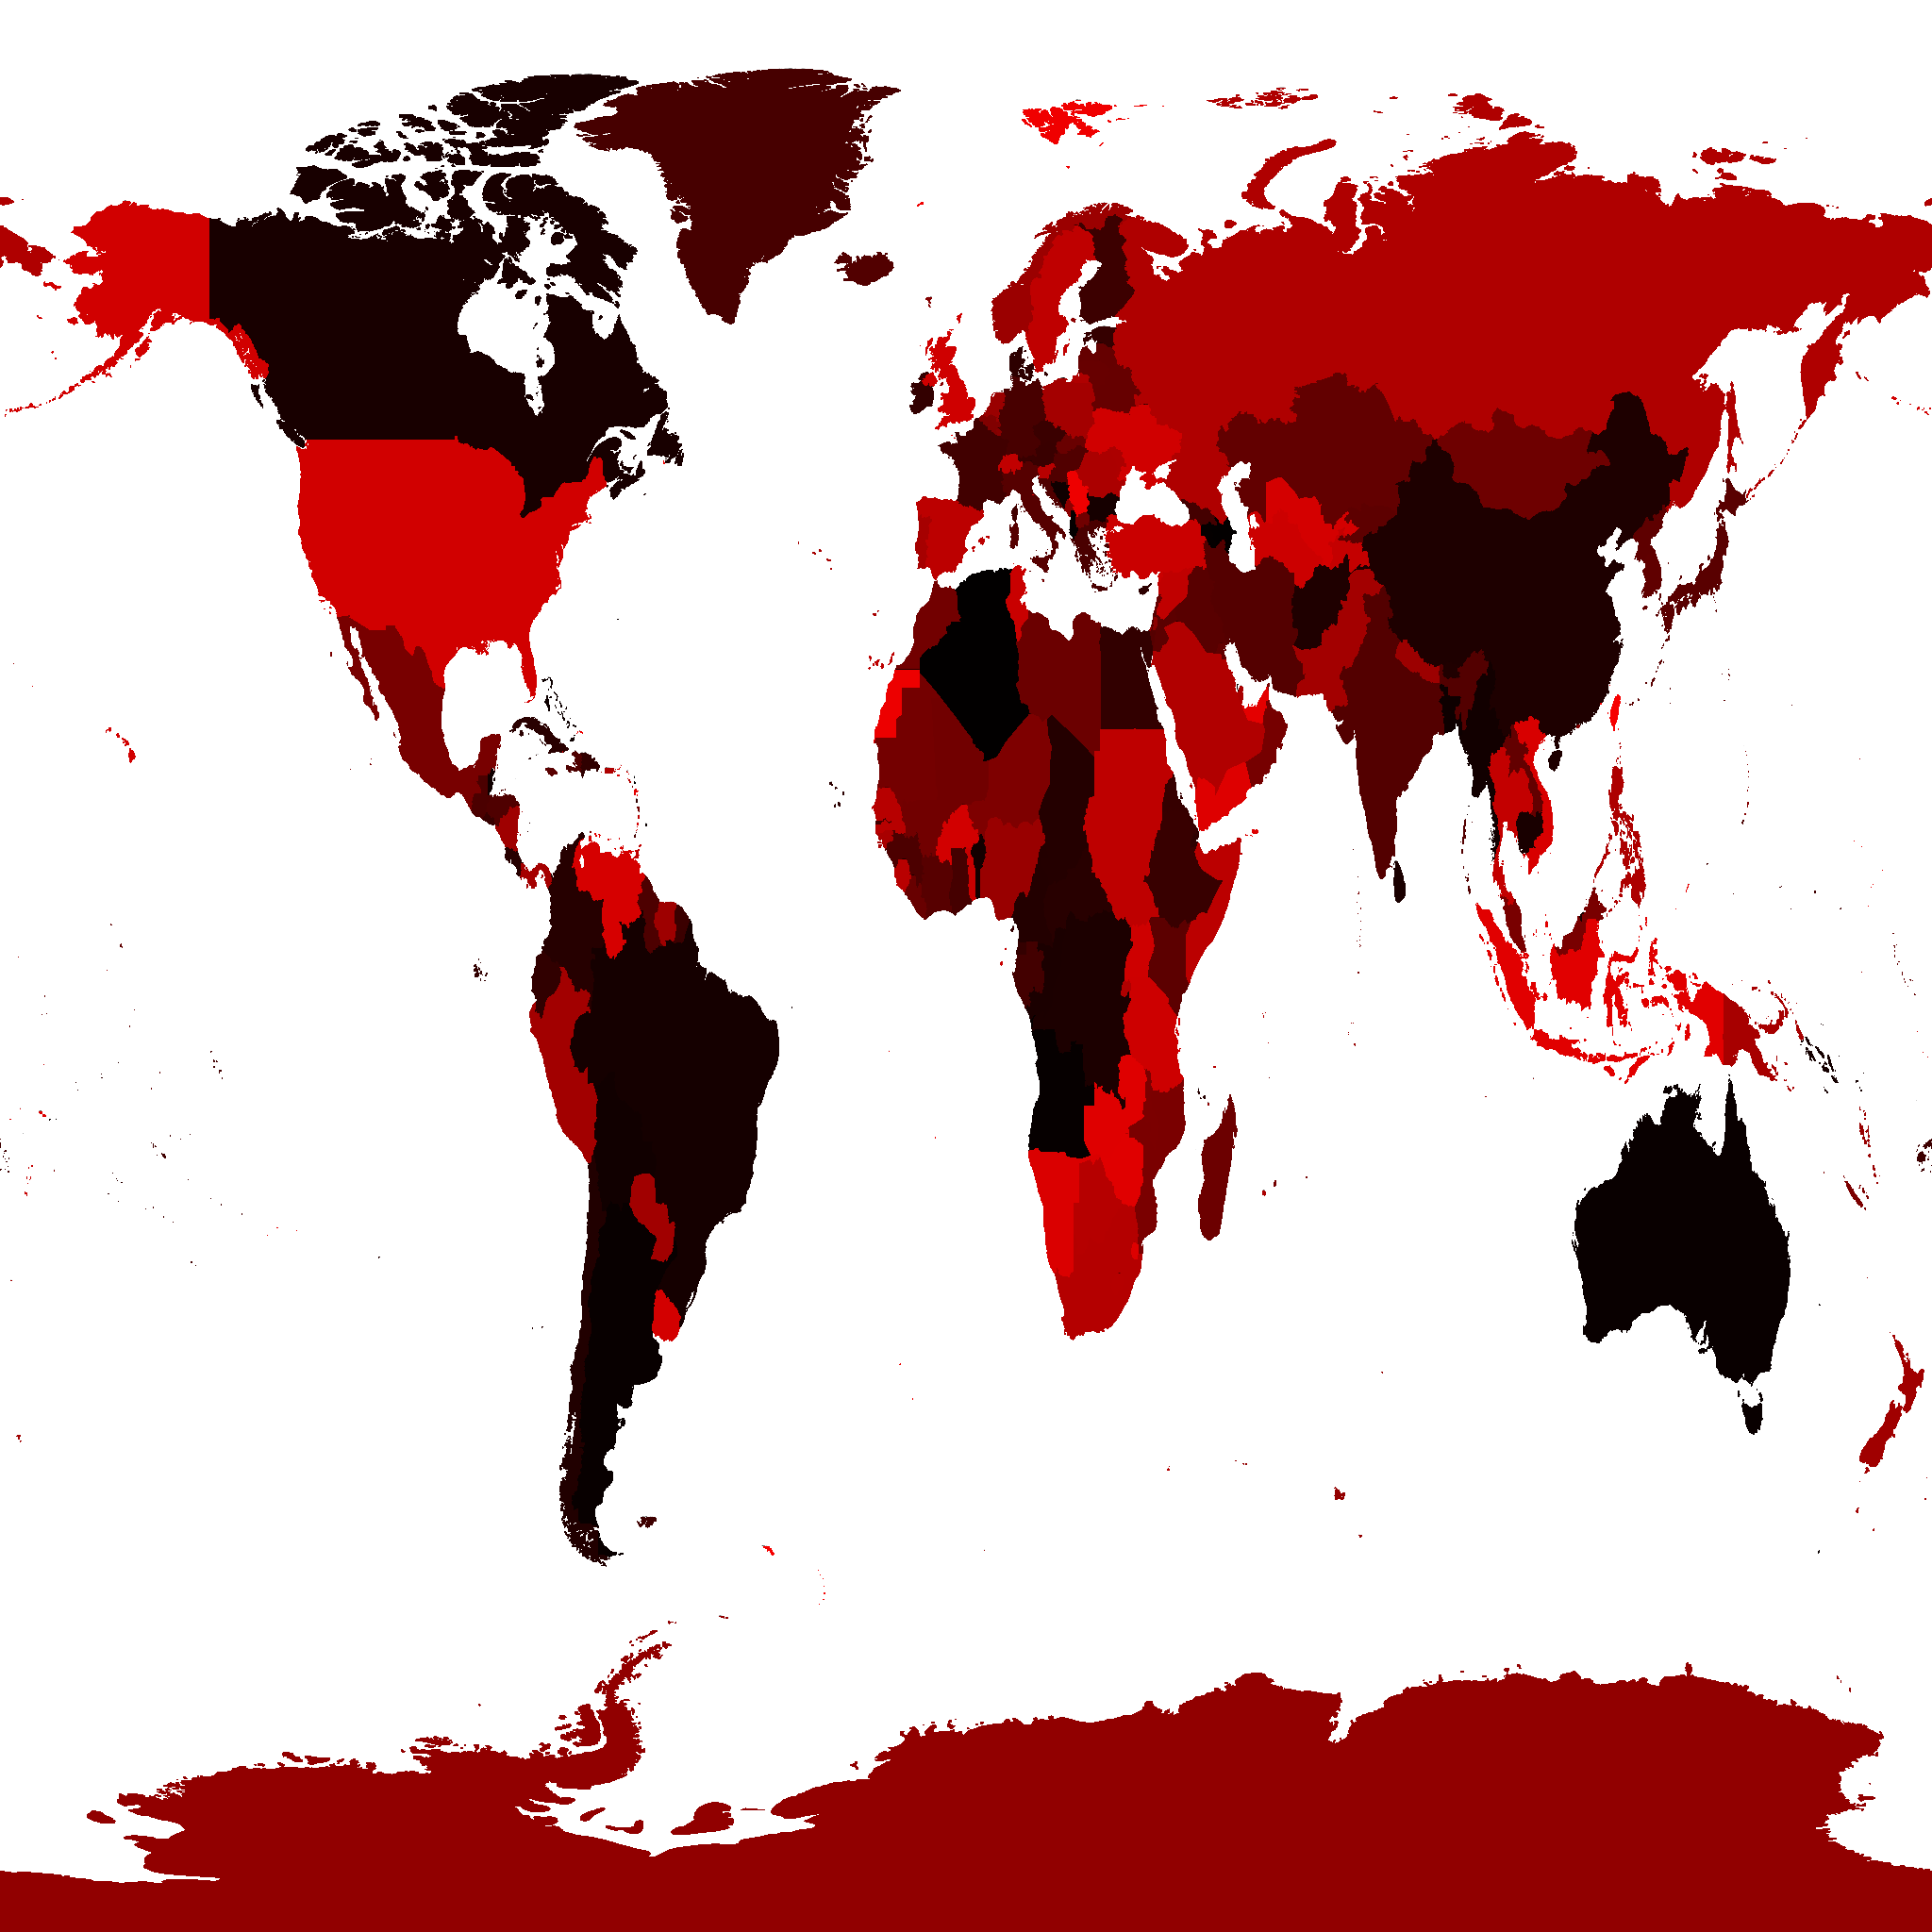
注:このテクスチャを生成するために使用されたデータはこのウェブサイトからのものでCC-BY-SAライセンスです。
たったの217KBになり、国のメッシュの14MBよりずっと良いです。 解像度を下げる事もできそうですが、今の所は217KBで充分だと思います。
これを使い国をピッキングしてみましょう。
GPUピッキング例からコードを取得すると、ピッキングシーンが必要です。
const pickingScene = new THREE.Scene();
pickingScene.background = new THREE.Color(0);
そして、ピッキングシーンに圧縮ステクスチャの地球儀の追加が必要です。
{
  const loader = new THREE.TextureLoader();
  const geometry = new THREE.SphereGeometry(1, 64, 32);

+  const indexTexture = loader.load('resources/data/world/country-index-texture.png', render);
+  indexTexture.minFilter = THREE.NearestFilter;
+  indexTexture.magFilter = THREE.NearestFilter;
+
+  const pickingMaterial = new THREE.MeshBasicMaterial({map: indexTexture});
+  pickingScene.add(new THREE.Mesh(geometry, pickingMaterial));

  const texture = loader.load('resources/data/world/country-outlines-4k.png', render);
  const material = new THREE.MeshBasicMaterial({map: texture});
  scene.add(new THREE.Mesh(geometry, material));
}
前に使った GPUPickingHelper クラスをコピーしましょう。
少し変更しました。
class GPUPickHelper {
  constructor() {
    // create a 1x1 pixel render target
    this.pickingTexture = new THREE.WebGLRenderTarget(1, 1);
    this.pixelBuffer = new Uint8Array(4);
-    this.pickedObject = null;
-    this.pickedObjectSavedColor = 0;
  }
  pick(cssPosition, scene, camera) {
    const {pickingTexture, pixelBuffer} = this;

    // set the view offset to represent just a single pixel under the mouse
    const pixelRatio = renderer.getPixelRatio();
    camera.setViewOffset(
        renderer.getContext().drawingBufferWidth,   // full width
        renderer.getContext().drawingBufferHeight,  // full top
        cssPosition.x * pixelRatio | 0,             // rect x
        cssPosition.y * pixelRatio | 0,             // rect y
        1,                                          // rect width
        1,                                          // rect height
    );
    // render the scene
    renderer.setRenderTarget(pickingTexture);
    renderer.render(scene, camera);
    renderer.setRenderTarget(null);
    // clear the view offset so rendering returns to normal
    camera.clearViewOffset();
    //read the pixel
    renderer.readRenderTargetPixels(
        pickingTexture,
        0,   // x
        0,   // y
        1,   // width
        1,   // height
        pixelBuffer);

+    const id =
+        (pixelBuffer[0] << 16) |
+        (pixelBuffer[1] <<  8) |
+        (pixelBuffer[2] <<  0);
+
+    return id;
-    const id =
-        (pixelBuffer[0] << 16) |
-        (pixelBuffer[1] <<  8) |
-        (pixelBuffer[2]      );
-    const intersectedObject = idToObject[id];
-    if (intersectedObject) {
-      // pick the first object. It's the closest one
-      this.pickedObject = intersectedObject;
-      // save its color
-      this.pickedObjectSavedColor = this.pickedObject.material.emissive.getHex();
-      // set its emissive color to flashing red/yellow
-      this.pickedObject.material.emissive.setHex((time * 8) % 2 > 1 ? 0xFFFF00 : 0xFF0000);
-    }
  }
}
これで国を選択できるようになりました。
const pickHelper = new GPUPickHelper();

function getCanvasRelativePosition(event) {
  const rect = canvas.getBoundingClientRect();
  return {
    x: (event.clientX - rect.left) * canvas.width  / rect.width,
    y: (event.clientY - rect.top ) * canvas.height / rect.height,
  };
}

function pickCountry(event) {
  // exit if we have not loaded the data yet
  if (!countryInfos) {
    return;
  }

  const position = getCanvasRelativePosition(event);
  const id = pickHelper.pick(position, pickingScene, camera);
  if (id > 0) {
    // we clicked a country. Toggle its 'selected' property
    const countryInfo = countryInfos[id - 1];
    const selected = !countryInfo.selected;
    // if we're selecting this country and modifiers are not
    // pressed unselect everything else.
    if (selected && !event.shiftKey && !event.ctrlKey && !event.metaKey) {
      unselectAllCountries();
    }
    numCountriesSelected += selected ? 1 : -1;
    countryInfo.selected = selected;
  } else if (numCountriesSelected) {
    // the ocean or sky was clicked
    unselectAllCountries();
  }
  requestRenderIfNotRequested();
}

function unselectAllCountries() {
  numCountriesSelected = 0;
  countryInfos.forEach((countryInfo) => {
    countryInfo.selected = false;
  });
}

canvas.addEventListener('pointerup', pickCountry);
上記のコードでは、国の配列に selected プロパティを設定/解除しています。
Shift や ctrl、cmd を押すと複数の国を選択できます。
残作業は選択した国を表示させるだけです。 ラベルを更新してみましょう。
function updateLabels() {
  // exit if we have not loaded the data yet
  if (!countryInfos) {
    return;
  }

  const large = settings.minArea * settings.minArea;
  // get a matrix that represents a relative orientation of the camera
  normalMatrix.getNormalMatrix(camera.matrixWorldInverse);
  // get the camera's position
  camera.getWorldPosition(cameraPosition);
  for (const countryInfo of countryInfos) {
-    const {position, elem, area} = countryInfo;
-    // large enough?
-    if (area < large) {
+    const {position, elem, area, selected} = countryInfo;
+    const largeEnough = area >= large;
+    const show = selected || (numCountriesSelected === 0 && largeEnough);
+    if (!show) {
      elem.style.display = 'none';
      continue;
    }

    ...
これで国を選択できるようになります。
地域に基づいて国を表示しますが、1つをクリックすると1つだけラベルが表示されます。
国を選択する合理的な解決策のように思えますが、選択された国を強調表示するにはどうでしょうか?
パレットグラフィックス からインスピレーションを得る事ができます。
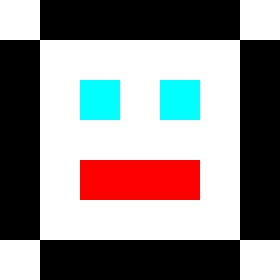
パレットグラフィックスやインデックスカラーはAtari 800、Amiga、ファミコン、スーパーファミコン、IBMの古いPCなどの古いシステムで使われていました。 ビットマップをRGBカラー8ビット、1ピクセル24バイト以上で格納するのではなく、ビットマップを8ビット以下の値で格納していました。 各ピクセルの値はパレットへのインデックスです。 そのため例えば画像内の値が3であれば "color 3を表示する" という事になります。 color 3が何色かは "パレット" と呼ばれる別の場所で定義されています。
JavaScriptでは次のようなコードにできます。
const face7x7PixelImageData = [
  0, 1, 1, 1, 1, 1, 0,
  1, 0, 0, 0, 0, 0, 1,
  1, 0, 2, 0, 2, 0, 1,
  1, 0, 0, 0, 0, 0, 1,
  1, 0, 3, 3, 3, 0, 1,
  1, 0, 0, 0, 0, 0, 1,
  0, 1, 1, 1, 1, 1, 1,
];

const palette = [
  [255, 255, 255],  // white
  [  0,   0,   0],  // black
  [  0, 255, 255],  // cyan
  [255,   0,   0],  // red
];
画像データの各ピクセルがパレットへのインデックスとなります。 上記のパレットを使い、画像データを解釈すると次のような画像が得られます。
この場合、上記のテクスチャは国ごとに異なるIDを持っています。 そこでパレットのテクスチャを通して同じテクスチャを使い、それぞれの国のカラーを出せば良いのです。 パレットの質感を変える事でそれぞれの国を彩る事ができます。 例えばパレットテクスチャ全体を黒に設定し、パレット内のある国のエントリーを別のカラーにするとその国だけを強調表示できます。
パレット化されたインデックスグラフィックスを行うにはカスタムシェーダーコードが必要です。 three.jsでデフォルトのシェーダーを変更してみましょう。 そうすれば、必要に応じてライティングなどの機能も使えます。
アニメーションする多くのオブジェクトを最適化の記事で解説したように、
マテリアルの onBeforeCompile プロパティに関数を追加するとデフォルトのシェーダーを変更できます。
デフォルトのフラグメントシェーダーはコンパイル前は以下のようになっています。
#include <common>
#include <color_pars_fragment>
#include <uv_pars_fragment>
#include <uv2_pars_fragment>
#include <map_pars_fragment>
#include <alphamap_pars_fragment>
#include <aomap_pars_fragment>
#include <lightmap_pars_fragment>
#include <envmap_pars_fragment>
#include <fog_pars_fragment>
#include <specularmap_pars_fragment>
#include <logdepthbuf_pars_fragment>
#include <clipping_planes_pars_fragment>
void main() {
    #include <clipping_planes_fragment>
    vec4 diffuseColor = vec4( diffuse, opacity );
    #include <logdepthbuf_fragment>
    #include <map_fragment>
    #include <color_fragment>
    #include <alphamap_fragment>
    #include <alphatest_fragment>
    #include <specularmap_fragment>
    ReflectedLight reflectedLight = ReflectedLight( vec3( 0.0 ), vec3( 0.0 ), vec3( 0.0 ), vec3( 0.0 ) );
    #ifdef USE_LIGHTMAP
        reflectedLight.indirectDiffuse += texture2D( lightMap, vUv2 ).xyz * lightMapIntensity;
    #else
        reflectedLight.indirectDiffuse += vec3( 1.0 );
    #endif
    #include <aomap_fragment>
    reflectedLight.indirectDiffuse *= diffuseColor.rgb;
    vec3 outgoingLight = reflectedLight.indirectDiffuse;
    #include <envmap_fragment>
    gl_FragColor = vec4( outgoingLight, diffuseColor.a );
    #include <premultiplied_alpha_fragment>
    #include <tonemapping_fragment>
    #include <encodings_fragment>
    #include <fog_fragment>
}
これらのスニペットを全て調べてみるとthree.jsはベースマテリアルのカラーを管理するために diffuseColor という変数が使用されています。
これは <color_fragment> スニペット に設定されているので修正できるはずです。
シェーダーで diffuseColor は既にアウトラインテクスチャのカラーになっているはずなので、パレットテクスチャからカラーを探して最終的な結果にそれらをミックスします。
前にやったように検索文字列と置換文字列の配列を作り、Material.onBeforeCompile でシェーダーに適用します。
{
  const loader = new THREE.TextureLoader();
  const geometry = new THREE.SphereGeometry(1, 64, 32);

  const indexTexture = loader.load('resources/data/world/country-index-texture.png', render);
  indexTexture.minFilter = THREE.NearestFilter;
  indexTexture.magFilter = THREE.NearestFilter;

  const pickingMaterial = new THREE.MeshBasicMaterial({map: indexTexture});
  pickingScene.add(new THREE.Mesh(geometry, pickingMaterial));

+  const fragmentShaderReplacements = [
+    {
+      from: '#include <common>',
+      to: `
+        #include <common>
+        uniform sampler2D indexTexture;
+        uniform sampler2D paletteTexture;
+        uniform float paletteTextureWidth;
+      `,
+    },
+    {
+      from: '#include <color_fragment>',
+      to: `
+        #include <color_fragment>
+        {
+          vec4 indexColor = texture2D(indexTexture, vUv);
+          float index = indexColor.r * 255.0 + indexColor.g * 255.0 * 256.0;
+          vec2 paletteUV = vec2((index + 0.5) / paletteTextureWidth, 0.5);
+          vec4 paletteColor = texture2D(paletteTexture, paletteUV);
+          // diffuseColor.rgb += paletteColor.rgb;   // white outlines
+          diffuseColor.rgb = paletteColor.rgb - diffuseColor.rgb;  // black outlines
+        }
+      `,
+    },
+  ];

  const texture = loader.load('resources/data/world/country-outlines-4k.png', render);
  const material = new THREE.MeshBasicMaterial({map: texture});
+  material.onBeforeCompile = function(shader) {
+    fragmentShaderReplacements.forEach((rep) => {
+      shader.fragmentShader = shader.fragmentShader.replace(rep.from, rep.to);
+    });
+  };
  scene.add(new THREE.Mesh(geometry, material));
}
上記のように indexTexture、paletteTexture、paletteTextureWidth の3つのユニフォームを追加します。
indexTexture からカラーを取得してインデックスに変換します。
vUv はthree.jsで提供されているテクスチャ座標です。
そのインデックスを使い、パレットテクスチャからカラーを取り出します。
その結果を現在の diffuseColor とミックスします。
diffuseColor は黒と白のアウトラインテクスチャなので、2色を加えると白のアウトラインになります。
現在の拡散色(ディフューズカラー)を引くと黒いアウトラインになります。
レンダリング前にパレットテクスチャと3つのユニフォームを設定する必要があります。
パレットテクスチャは、国ごとに1色 + 海のための1色を保持するのに十分な幅が必要です(id = 0)。 240の国があります。 国のリストがロードされるまで待ち、正確な数字を得るか、それを調べる事ができます。 少し大きめの数字を選んでも、あまり害はないので512を選びましょう。
パレットテクスチャを作成するコードは以下の通りです。
const maxNumCountries = 512;
const paletteTextureWidth = maxNumCountries;
const paletteTextureHeight = 1;
const palette = new Uint8Array(paletteTextureWidth * 3);
const paletteTexture = new THREE.DataTexture(
    palette, paletteTextureWidth, paletteTextureHeight, THREE.RGBFormat);
paletteTexture.minFilter = THREE.NearestFilter;
paletteTexture.magFilter = THREE.NearestFilter;
DataTexture はテクスチャの生データを与える事ができます。
今回はは512のRGBカラーを3バイトずつ与え、それぞれのバイトが赤、緑、青で0〜255の値を使用します。
ランダムなカラーで塗りつぶしましょう!
for (let i = 1; i < palette.length; ++i) {
  palette[i] = Math.random() * 256;
}
// set the ocean color (index #0)
palette.set([100, 200, 255], 0);
paletteTexture.needsUpdate = true;
パレットテクスチャを palette 配列の内容で更新したい時は、常に paletteTexture.needsUpdate を true にする必要があります。
これはマテリアルのユニフォームに設定する必要があります。
const geometry = new THREE.SphereGeometry(1, 64, 32);
const material = new THREE.MeshBasicMaterial({map: texture});
material.onBeforeCompile = function(shader) {
  fragmentShaderReplacements.forEach((rep) => {
    shader.fragmentShader = shader.fragmentShader.replace(rep.from, rep.to);
  });
+  shader.uniforms.paletteTexture = {value: paletteTexture};
+  shader.uniforms.indexTexture = {value: indexTexture};
+  shader.uniforms.paletteTextureWidth = {value: paletteTextureWidth};
};
scene.add(new THREE.Mesh(geometry, material));
ランダムなカラーがついた国を手に入れる事ができました。
インデックスとパレットテクスチャの動作が確認できたので、パレットを操作してハイライトにしてみましょう。
まず、three.jsスタイルカラーを渡してパレットのテクスチャに入れる値を与える関数を作ってみましょう。
const tempColor = new THREE.Color();
function get255BasedColor(color) {
  tempColor.set(color);
  return tempColor.toArray().map(v => v * 255);
}
このように color = get255BasedColor('red') を呼び出すと [255, 0, 0] のような配列が返されます。
次はそれを使って、いくつかのカラーを作ってパレットを埋めていきましょう。
const selectedColor = get255BasedColor('red');
const unselectedColor = get255BasedColor('#444');
const oceanColor = get255BasedColor('rgb(100,200,255)');
resetPalette();

function setPaletteColor(index, color) {
  palette.set(color, index * 3);
}

function resetPalette() {
  // make all colors the unselected color
  for (let i = 1; i < maxNumCountries; ++i) {
    setPaletteColor(i, unselectedColor);
  }

  // set the ocean color (index #0)
  setPaletteColor(0, oceanColor);
  paletteTexture.needsUpdate = true;
}
これらの関数を使い、国が選択された時にパレットを更新してみましょう。
function getCanvasRelativePosition(event) {
  const rect = canvas.getBoundingClientRect();
  return {
    x: (event.clientX - rect.left) * canvas.width  / rect.width,
    y: (event.clientY - rect.top ) * canvas.height / rect.height,
  };
}

function pickCountry(event) {
  // exit if we have not loaded the data yet
  if (!countryInfos) {
    return;
  }

  const position = getCanvasRelativePosition(event);
  const id = pickHelper.pick(position, pickingScene, camera);
  if (id > 0) {
    const countryInfo = countryInfos[id - 1];
    const selected = !countryInfo.selected;
    if (selected && !event.shiftKey && !event.ctrlKey && !event.metaKey) {
      unselectAllCountries();
    }
    numCountriesSelected += selected ? 1 : -1;
    countryInfo.selected = selected;
+    setPaletteColor(id, selected ? selectedColor : unselectedColor);
+    paletteTexture.needsUpdate = true;
  } else if (numCountriesSelected) {
    unselectAllCountries();
  }
  requestRenderIfNotRequested();
}

function unselectAllCountries() {
  numCountriesSelected = 0;
  countryInfos.forEach((countryInfo) => {
    countryInfo.selected = false;
  });
+  resetPalette();
}
1つ以上の国を強調する事ができるようにする必要があります。
これで動作しました!
ちょっとした事ですが、選択状態を変えないと地球儀を回せないです。 国を選択してから地球儀を回転させると選択範囲が変わります。
修正してみましょう。 思いつく限りでは2つの事が確認できます。 クリックしてから手放すまでにどれだけの時間が経過したか。 もう1つはユーザーが実際にマウスを動かしたかどうかです。 時間が短かったり、マウスを動かさなかった場合はクリックだったのではないでしょうか。 そうでなければ、地球を引っ張っていこうとしていたのでしょう。
+const maxClickTimeMs = 200;
+const maxMoveDeltaSq = 5 * 5;
+const startPosition = {};
+let startTimeMs;
+
+function recordStartTimeAndPosition(event) {
+  startTimeMs = performance.now();
+  const pos = getCanvasRelativePosition(event);
+  startPosition.x = pos.x;
+  startPosition.y = pos.y;
+}

function getCanvasRelativePosition(event) {
  const rect = canvas.getBoundingClientRect();
  return {
    x: (event.clientX - rect.left) * canvas.width  / rect.width,
    y: (event.clientY - rect.top ) * canvas.height / rect.height,
  };
}

function pickCountry(event) {
  // exit if we have not loaded the data yet
  if (!countryInfos) {
    return;
  }

+  // if it's been a moment since the user started
+  // then assume it was a drag action, not a select action
+  const clickTimeMs = performance.now() - startTimeMs;
+  if (clickTimeMs > maxClickTimeMs) {
+    return;
+  }
+
+  // if they moved assume it was a drag action
+  const position = getCanvasRelativePosition(event);
+  const moveDeltaSq = (startPosition.x - position.x) ** 2 +
+                      (startPosition.y - position.y) ** 2;
+  if (moveDeltaSq > maxMoveDeltaSq) {
+    return;
+  }

-  const position = {x: event.clientX, y: event.clientY};
  const id = pickHelper.pick(position, pickingScene, camera);
  if (id > 0) {
    const countryInfo = countryInfos[id - 1];
    const selected = !countryInfo.selected;
    if (selected && !event.shiftKey && !event.ctrlKey && !event.metaKey) {
      unselectAllCountries();
    }
    numCountriesSelected += selected ? 1 : -1;
    countryInfo.selected = selected;
    setPaletteColor(id, selected ? selectedColor : unselectedColor);
    paletteTexture.needsUpdate = true;
  } else if (numCountriesSelected) {
    unselectAllCountries();
  }
  requestRenderIfNotRequested();
}

function unselectAllCountries() {
  numCountriesSelected = 0;
  countryInfos.forEach((countryInfo) => {
    countryInfo.selected = false;
  });
  resetPalette();
}

+canvas.addEventListener('pointerdown', recordStartTimeAndPosition);
canvas.addEventListener('pointerup', pickCountry);
これらの変更を加えると私にはそれが機能しているように見えます。
私はUXの専門家ではないので、もっと良い解決策があれば教えて下さい。
インデックスグラフィックスがどのように役立つのか、また、three.jsが作るシェーダーを変更してシンプルな機能を追加する方法が少しでも理解してもらえたと思います。 シェーダーが書かれている言語のGLSLの使い方は、この記事で扱うには内容が大きすぎます。 ポストプロセスの記事にGLSLのリンクがあるので確認してみて下さい。