でHTML要素を3Dに揃える
この記事はThree.jsの連載記事の1つです。 最初の記事はThree.jsの基礎知識です。 まだ読んでいない場合、そこから始めると良いかもしれません。
3Dシーンにテキスト表示させたい場合があると思います。 メリットとデメリットを持つ多くの方法があります。
3Dテキストを使用する
プリミティブの記事を見ると
TextGeometryがあり、3Dテキストが作れます。 ロゴを飛ばすには便利ですが、統計や情報、ラベル付けなどにはあまり便利でないかもしれません。テキストが描かれたテクスチャを使用する
この記事ではキャンバスをテクスチャとして使いました。 キャンバスにテキストを描画してビルボードとして表示できます。 この方法のメリットは、3Dシーンにテキストが組み込まれている事かもしれません。 3Dシーンの中でPC端末のようなものを描画するには最適かもしれません。
HTML要素を3D空間に合わせて配置する
この方法のメリットは全てのHTMLを使えます。 HTMLは複数の要素を持てます。 また、CSSでスタイルを整えられます。 実際のテキストなのでユーザーが選択する事もできます。
この記事では、HTML要素を3D空間に合わせて配置を取り上げます。
まずは簡単に始めてみましょう。 いくつかのプリミティブで3Dシーンを作り、それぞれのプリミティブにラベルを付けます。 レスポンシブの記事の例を使います。
ライティングの記事のように OrbitControls を追加します。
import * as THREE from '/build/three.module.js';
+import {OrbitControls} from '/examples/jsm/controls/OrbitControls.js';
const controls = new OrbitControls(camera, canvas);
controls.target.set(0, 0, 0);
controls.update();
ラベル要素を含むHTML要素を追加します。
<body>
-  <canvas id="c"></canvas>
+  <div id="container">
+    <canvas id="c"></canvas>
+    <div id="labels"></div>
+  </div>
</body>
キャンバスと <div id="labels"> の両方を親コンテナ配下に入れて、CSSで重なるように設定できます。
#c {
-    width: 100%;
-    height: 100%;
+    width: 100%;  /* let our container decide our size */
+    height: 100%;
    display: block;
}
+#container {
+  position: relative;  /* makes this the origin of its children */
+  width: 100%;
+  height: 100%;
+  overflow: hidden;
+}
+#labels {
+  position: absolute;  /* let us position ourself inside the container */
+  left: 0;             /* make our position the top left of the container */
+  top: 0;
+  color: white;
+}
ラベル自体にもCSSを追加しましょう。
#labels>div {
  position: absolute;  /* let us position them inside the container */
  left: 0;             /* make their default position the top left of the container */
  top: 0;
  cursor: pointer;     /* change the cursor to a hand when over us */
  font-size: large;
  user-select: none;   /* don't let the text get selected */
  text-shadow:         /* create a black outline */
    -1px -1px 0 #000,
     0   -1px 0 #000,
     1px -1px 0 #000,
     1px  0   0 #000,
     1px  1px 0 #000,
     0    1px 0 #000,
    -1px  1px 0 #000,
    -1px  0   0 #000;
}
#labels>div:hover {
  color: red;
}
HTMLに多くのラベル要素を追加する必要はありません。
立方体を生成する関数 makeInstance があります。
この関数にラベル要素も追加してみましょう。
+const labelContainerElem = document.querySelector('#labels');

-function makeInstance(geometry, color, x) {
+function makeInstance(geometry, color, x, name) {
  const material = new THREE.MeshPhongMaterial({color});

  const cube = new THREE.Mesh(geometry, material);
  scene.add(cube);

  cube.position.x = x;

+  const elem = document.createElement('div');
+  elem.textContent = name;
+  labelContainerElem.appendChild(elem);

-  return cube;
+  return {cube, elem};
}
立方体ごとに1つずつコンテナに <div> を追加しています。
ラベルのために cube と elem の両方を持つオブジェクトを返します。
この関数を呼び出すには、ラベル名も指定する必要があります。
const cubes = [
-  makeInstance(geometry, 0x44aa88,  0),
-  makeInstance(geometry, 0x8844aa, -2),
-  makeInstance(geometry, 0xaa8844,  2),
+  makeInstance(geometry, 0x44aa88,  0, 'Aqua'),
+  makeInstance(geometry, 0x8844aa, -2, 'Purple'),
+  makeInstance(geometry, 0xaa8844,  2, 'Gold'),
];
あとはレンダリング時にラベル要素を配置します。
const tempV = new THREE.Vector3();

...

-cubes.forEach((cube, ndx) => {
+cubes.forEach((cubeInfo, ndx) => {
+  const {cube, elem} = cubeInfo;
  const speed = 1 + ndx * .1;
  const rot = time * speed;
  cube.rotation.x = rot;
  cube.rotation.y = rot;

+  // get the position of the center of the cube
+  cube.updateWorldMatrix(true, false);
+  cube.getWorldPosition(tempV);
+
+  // get the normalized screen coordinate of that position
+  // x and y will be in the -1 to +1 range with x = -1 being
+  // on the left and y = -1 being on the bottom
+  tempV.project(camera);
+
+  // convert the normalized position to CSS coordinates
+  const x = (tempV.x *  .5 + .5) * canvas.clientWidth;
+  const y = (tempV.y * -.5 + .5) * canvas.clientHeight;
+
+  // move the elem to that position
+  elem.style.transform = `translate(-50%, -50%) translate(${x}px,${y}px)`;
});
そして、ラベルを対応するオブジェクトに合わせて位置を指定します。
動かしてみると対処したい問題がいくつか出ると思います。
1つの問題は、オブジェクトを回転させると全てのラベルが重なってしまいます。
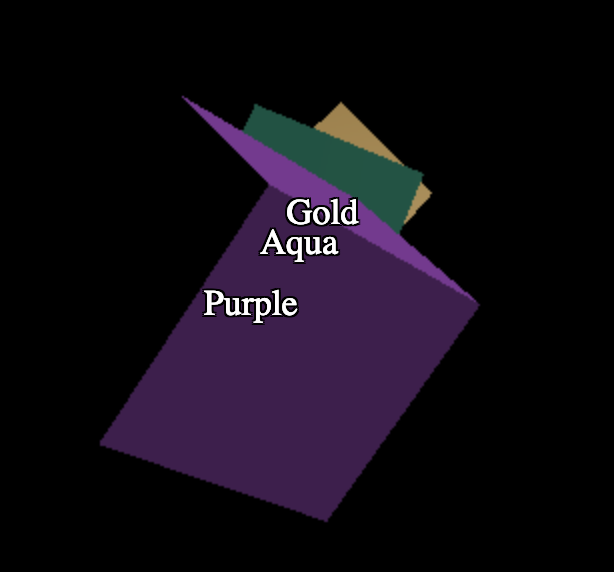
もう1つの問題は、オブジェクトが錐台の外に出るようにズームアウトしても、ラベルが消えずに表示されたままです。
オブジェクトが重なる問題の解決策はピッキング記事のピッキングコードを使います。
画面上のオブジェクトの位置を入力し、RayCaster にどのオブジェクトが交差していたか教えてもらいます。
オブジェクトが最初のものでなければ前面に表示されません。
const tempV = new THREE.Vector3();
+const raycaster = new THREE.Raycaster();

...

cubes.forEach((cubeInfo, ndx) => {
  const {cube, elem} = cubeInfo;
  const speed = 1 + ndx * .1;
  const rot = time * speed;
  cube.rotation.x = rot;
  cube.rotation.y = rot;

  // get the position of the center of the cube
  cube.updateWorldMatrix(true, false);
  cube.getWorldPosition(tempV);

  // get the normalized screen coordinate of that position
  // x and y will be in the -1 to +1 range with x = -1 being
  // on the left and y = -1 being on the bottom
  tempV.project(camera);

+  // ask the raycaster for all the objects that intersect
+  // from the eye toward this object's position
+  raycaster.setFromCamera(tempV, camera);
+  const intersectedObjects = raycaster.intersectObjects(scene.children);
+  // We're visible if the first intersection is this object.
+  const show = intersectedObjects.length && cube === intersectedObjects[0].object;
+
+  if (!show) {
+    // hide the label
+    elem.style.display = 'none';
+  } else {
+    // un-hide the label
+    elem.style.display = '';

    // convert the normalized position to CSS coordinates
    const x = (tempV.x *  .5 + .5) * canvas.clientWidth;
    const y = (tempV.y * -.5 + .5) * canvas.clientHeight;

    // move the elem to that position
    elem.style.transform = `translate(-50%, -50%) translate(${x}px,${y}px)`;
+  }
});
これで重なり問題に対応しました。
以下は tempV.z をチェックし、オブジェクトの原点が錐台の外にあるかをチェックします。
-  if (!show) {
+  if (!show || Math.abs(tempV.z) > 1) {
    // hide the label
    elem.style.display = 'none';
正規化された座標には計算した z の値が含まれており、カメラの錐台の near は-1、far は+1の値になります。
錐台のチェックではオブジェクトの原点をチェックしているだけなので、上記の解決策では失敗します。特に大きなオブジェクトの場合などです。 オブジェクトの原点は錐台の外にあるかもしれませんが、オブジェクトの半分は錐台の中にあるかもしれません。
正しい解決策は、オブジェクト自体が錐台に入っているか確認する事でしょう。 ただし、残念ながらチェックの動作が遅いです。 3つの立方体の場合は問題ないですが、オブジェクトがたくさんある場合は問題になるかもしれません。
Three.jsには、球体オブジェクトが錐台内にあるかチェックする関数がいくつか用意されています。
// at init time
const frustum = new THREE.Frustum();
const viewProjection = new THREE.Matrix4();

...

// before checking
camera.updateMatrix();
camera.updateMatrixWorld();
camera.matrixWorldInverse.copy(camera.matrixWorld).invert();

...

// then for each mesh
someMesh.updateMatrix();
someMesh.updateMatrixWorld();

viewProjection.multiplyMatrices(
    camera.projectionMatrix, camera.matrixWorldInverse);
frustum.setFromProjectionMatrix(viewProjection);
const inFrustum = frustum.contains(someMesh));
現在の重なりの解決策にも同様の問題があります。 ピッキングが遅いです。 ピッキングの記事で取り上げたように、GPUベースのピッキングを使う事もできますがコストがかからない訳ではありません。 どの解決策を選択するかはニーズによります。
もう1つの問題はラベルの表示順序です。 コードを変更してラベルを長くなると
const cubes = [
-  makeInstance(geometry, 0x44aa88,  0, 'Aqua'),
-  makeInstance(geometry, 0x8844aa, -2, 'Purple'),
-  makeInstance(geometry, 0xaa8844,  2, 'Gold'),
+  makeInstance(geometry, 0x44aa88,  0, 'Aqua Colored Box'),
+  makeInstance(geometry, 0x8844aa, -2, 'Purple Colored Box'),
+  makeInstance(geometry, 0xaa8844,  2, 'Gold Colored Box'),
];
折り返さないようにCSSで設定します。
#labels>div {
+  white-space: nowrap;
そうすると次のような問題が発生します。
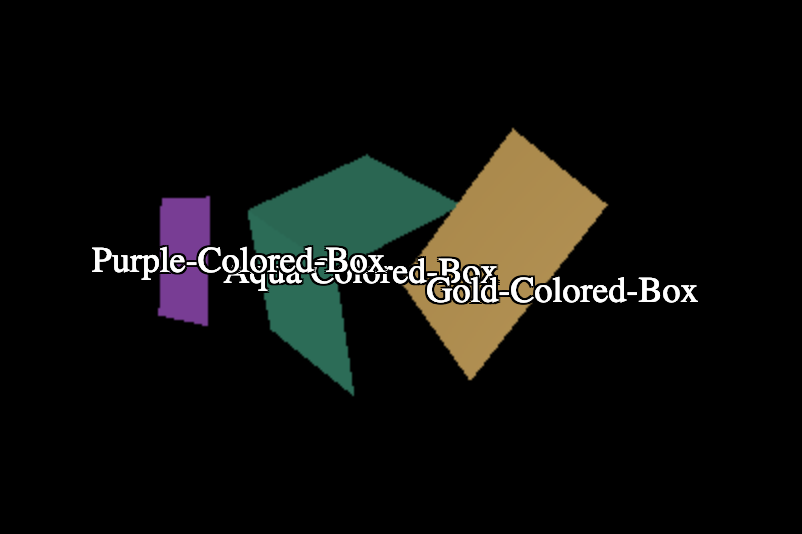
上記では紫のボックスは奥にありますが、紫のボックスのラベルはアクアのボックスの前にあります。
これは各要素の zIndex を設定して修正できます。
投影された位置の z は-1(手前)〜+1(奥)の値を持ちます。
zIndex は整数である必要があります。
逆方向の意味で zIndex の値が大きい方が手前にある事を意味します。
以下のコードで動作するはずです。
// convert the normalized position to CSS coordinates
const x = (tempV.x *  .5 + .5) * canvas.clientWidth;
const y = (tempV.y * -.5 + .5) * canvas.clientHeight;

// move the elem to that position
elem.style.transform = `translate(-50%, -50%) translate(${x}px,${y}px)`;

+// set the zIndex for sorting
+elem.style.zIndex = (-tempV.z * .5 + .5) * 100000 | 0;
zIndexを正しく動作させるには、値を分散させるために大きな数値を選ぶ必要があります。
そうしないと多くの値が同じ値になってしまいます。
ラベルがページの他の部分と重ならないように、ラベルのコンテナの z-index を設定し、新しいスタッキングコンテキストを作成します。
#labels {
  position: absolute;  /* let us position ourself inside the container */
+  z-index: 0;          /* make a new stacking context so children don't sort with rest of page */
  left: 0;             /* make our position the top left of the container */
  top: 0;
  color: white;
  z-index: 0;
}
これでラベルは常に正しい順序で表示されます。
もう1つの問題を確認ために、もう1つの例をやってみましょう。 Googleマップのような地球儀を描いて、国名のラベルを貼ってみましょう。
国境を含むこのデータを見つけました。 このデータはCC-BY-SAライセンスです。
データを読み込んで、国の概要と国名、その位置を含むJSONデータを生成するためのコードを書いてみました。
JSONデータは以下のような配列です。
[
  {
    "name": "Algeria",
    "min": [
      -8.667223,
      18.976387
    ],
    "max": [
      11.986475,
      37.091385
    ],
    "area": 238174,
    "lat": 28.163,
    "lon": 2.632,
    "population": {
      "2005": 32854159
    }
  },
  ...
min、max、lat、lon、これは全て緯度と経度です。
ロードしてみましょう。 このコードは多くのオブジェクトを最適化のコードの流用ですが、オブジェクトをたくさん描画しているわけではないので要求されたレンダリングと同じ解決策を使います。
まずは球体を作り、アウトラインテクスチャを使います。
{
  const loader = new THREE.TextureLoader();
  const texture = loader.load('resources/data/world/country-outlines-4k.png', render);
  const geometry = new THREE.SphereGeometry(1, 64, 32);
  const material = new THREE.MeshBasicMaterial({map: texture});
  scene.add(new THREE.Mesh(geometry, material));
}
ローダー関数を作ってJSONファイルをロードしてみましょう。
async function loadJSON(url) {
  const req = await fetch(url);
  return req.json();
}
そして、その関数を呼び出します。
let countryInfos;
async function loadCountryData() {
  countryInfos = await loadJSON('resources/data/world/country-info.json');
     ...
  }
  requestRenderIfNotRequested();
}
loadCountryData();
では、そのデータを使ってラベルを生成して配置してみましょう。
多くのオブジェクトを最適化の記事ではヘルパーオブジェクトの小さなシーングラフを設定し、地球儀上の緯度と経度の位置を簡単に計算できるようにしました。 仕組みの説明はその記事を参照して下さい。
const lonFudge = Math.PI * 1.5;
const latFudge = Math.PI;
// these helpers will make it easy to position the boxes
// We can rotate the lon helper on its Y axis to the longitude
const lonHelper = new THREE.Object3D();
// We rotate the latHelper on its X axis to the latitude
const latHelper = new THREE.Object3D();
lonHelper.add(latHelper);
// The position helper moves the object to the edge of the sphere
const positionHelper = new THREE.Object3D();
positionHelper.position.z = 1;
latHelper.add(positionHelper);
これを使い、各ラベルの位置を計算します。
const labelParentElem = document.querySelector('#labels');
for (const countryInfo of countryInfos) {
  const {lat, lon, name} = countryInfo;

  // adjust the helpers to point to the latitude and longitude
  lonHelper.rotation.y = THREE.MathUtils.degToRad(lon) + lonFudge;
  latHelper.rotation.x = THREE.MathUtils.degToRad(lat) + latFudge;

  // get the position of the lat/lon
  positionHelper.updateWorldMatrix(true, false);
  const position = new THREE.Vector3();
  positionHelper.getWorldPosition(position);
  countryInfo.position = position;

  // add an element for each country
  const elem = document.createElement('div');
  elem.textContent = name;
  labelParentElem.appendChild(elem);
  countryInfo.elem = elem;
上記のコードは、立方体のラベルを作成するために書いたコードに非常に似てます。
これで配列 countryInfos ができました。
国ごとのlabel要素に elem プロパティを追加し、位置を表す position を追加しました。
立方体の場合と同じく、ラベルの位置とレンダリング時間を更新します。
const tempV = new THREE.Vector3();

function updateLabels() {
  // exit if we have not yet loaded the JSON file
  if (!countryInfos) {
    return;
  }

  for (const countryInfo of countryInfos) {
    const {position, elem} = countryInfo;

    // get the normalized screen coordinate of that position
    // x and y will be in the -1 to +1 range with x = -1 being
    // on the left and y = -1 being on the bottom
    tempV.copy(position);
    tempV.project(camera);

    // convert the normalized position to CSS coordinates
    const x = (tempV.x *  .5 + .5) * canvas.clientWidth;
    const y = (tempV.y * -.5 + .5) * canvas.clientHeight;

    // move the elem to that position
    elem.style.transform = `translate(-50%, -50%) translate(${x}px,${y}px)`;

    // set the zIndex for sorting
    elem.style.zIndex = (-tempV.z * .5 + .5) * 100000 | 0;
  }
}
上記のコードは、前の立方体のコードと実質的に似ています。 唯一の大きな違いは、初期化時にラベルの位置を事前に計算しました。 地球儀が動かないため可能です。カメラだけが動きます。
最後にループ処理するrender関数の中で updateLabels を呼び出します。
function render() {
  renderRequested = false;

  if (resizeRendererToDisplaySize(renderer)) {
    const canvas = renderer.domElement;
    camera.aspect = canvas.clientWidth / canvas.clientHeight;
    camera.updateProjectionMatrix();
  }

  controls.update();

+  updateLabels();

  renderer.render(scene, camera);
}
そして、これが結果です。
ラベルが多すぎる!
問題は2つあります。
地球儀の背面の国のラベルも表示されてる
ラベルが多すぎる
問題1では球体以外に交わるものがないので、上記で説明したように RayCaster を使う事はできません。
代わりにできるのは特定の国が離れているか確認する事です。
これはラベルの位置が球体の周囲にあるために動作します。
実際には単位球体を使っており、半径1.0の球体です。
つまり、位置は単位方向になっており計算が比較的簡単になります。
const tempV = new THREE.Vector3();
+const cameraToPoint = new THREE.Vector3();
+const cameraPosition = new THREE.Vector3();
+const normalMatrix = new THREE.Matrix3();

function updateLabels() {
  // exit if we have not yet loaded the JSON file
  if (!countryInfos) {
    return;
  }

+  const minVisibleDot = 0.2;
+  // get a matrix that represents a relative orientation of the camera
+  normalMatrix.getNormalMatrix(camera.matrixWorldInverse);
+  // get the camera's position
+  camera.getWorldPosition(cameraPosition);
  for (const countryInfo of countryInfos) {
    const {position, elem} = countryInfo;

+    // Orient the position based on the camera's orientation.
+    // Since the sphere is at the origin and the sphere is a unit sphere
+    // this gives us a camera relative direction vector for the position.
+    tempV.copy(position);
+    tempV.applyMatrix3(normalMatrix);
+
+    // compute the direction to this position from the camera
+    cameraToPoint.copy(position);
+    cameraToPoint.applyMatrix4(camera.matrixWorldInverse).normalize();
+
+    // get the dot product of camera relative direction to this position
+    // on the globe with the direction from the camera to that point.
+    // 1 = facing directly towards the camera
+    // 0 = exactly on tangent of the sphere from the camera
+    // < 0 = facing away
+    const dot = tempV.dot(cameraToPoint);
+
+    // if the orientation is not facing us hide it.
+    if (dot < minVisibleDot) {
+      elem.style.display = 'none';
+      continue;
+    }
+
+    // restore the element to its default display style
+    elem.style.display = '';

    // get the normalized screen coordinate of that position
    // x and y will be in the -1 to +1 range with x = -1 being
    // on the left and y = -1 being on the bottom
    tempV.copy(position);
    tempV.project(camera);

    // convert the normalized position to CSS coordinates
    const x = (tempV.x *  .5 + .5) * canvas.clientWidth;
    const y = (tempV.y * -.5 + .5) * canvas.clientHeight;

    // move the elem to that position
    countryInfo.elem.style.transform = `translate(-50%, -50%) translate(${x}px,${y}px)`;

    // set the zIndex for sorting
    elem.style.zIndex = (-tempV.z * .5 + .5) * 100000 | 0;
  }
}
上記では位置を方向として使用し、カメラに対して相対的にその方向を取得しています。 カメラから地球儀上のその位置までのカメラの相対的な方向を取得し、内積 を取得します。 内積はベクトル間の角度のコサインを返します。 これで -1 〜 +1までの値を取得できます。 -1はラベルがカメラに向いており、0はラベルがカメラから見て球体の端にあって、0より大きいものは背面にあります。 その値を使用してラベル要素の表示・非表示をします。
上記の図では、カメラからその位置までのラベルの向きの内積を表しています。 方向を回転させるとカメラに直接向いている時は、内積は-1.0になります。 カメラに相対する球体の接線上にある時は0.0になります。 別の言い方をすれば、2つのベクトルがお互いに90度垂直な時は0になります。
問題2はラベルが多すぎて、どのラベルを表示するか決める方法が必要です。 1つの方法は大きな国のラベルのみを表示します。 読込中のデータには、国がカバーする領域の最小値と最大値が含まれています。 そこから面積を計算し、その面積を使い表示するか決められます。
初期化時に面積を計算してみましょう。
const labelParentElem = document.querySelector('#labels');
for (const countryInfo of countryInfos) {
  const {lat, lon, min, max, name} = countryInfo;

  // adjust the helpers to point to the latitude and longitude
  lonHelper.rotation.y = THREE.MathUtils.degToRad(lon) + lonFudge;
  latHelper.rotation.x = THREE.MathUtils.degToRad(lat) + latFudge;

  // get the position of the lat/lon
  positionHelper.updateWorldMatrix(true, false);
  const position = new THREE.Vector3();
  positionHelper.getWorldPosition(position);
  countryInfo.position = position;

+  // compute the area for each country
+  const width = max[0] - min[0];
+  const height = max[1] - min[1];
+  const area = width * height;
+  countryInfo.area = area;

  // add an element for each country
  const elem = document.createElement('div');
  elem.textContent = name;
  labelParentElem.appendChild(elem);
  countryInfo.elem = elem;
}
レンダリング時にその領域を使い、ラベルを表示するか決めましょう。
+const large = 20 * 20;
const maxVisibleDot = 0.2;
// get a matrix that represents a relative orientation of the camera
normalMatrix.getNormalMatrix(camera.matrixWorldInverse);
// get the camera's position
camera.getWorldPosition(cameraPosition);
for (const countryInfo of countryInfos) {
-  const {position, elem} = countryInfo;
+  const {position, elem, area} = countryInfo;
+  // large enough?
+  if (area < large) {
+    elem.style.display = 'none';
+    continue;
+  }

  ...
私にはこの設定のための良い値が何か分からないです。 値を操作できるようにGUIを追加します。
import * as THREE from '/build/three.module.js';
import {OrbitControls} from '/examples/jsm/controls/OrbitControls.js';
+import {GUI} from '/examples/jsm/libs/lil-gui.module.min.js';
+const settings = {
+  minArea: 20,
+  maxVisibleDot: -0.2,
+};
+const gui = new GUI({width: 300});
+gui.add(settings, 'minArea', 0, 50).onChange(requestRenderIfNotRequested);
+gui.add(settings, 'maxVisibleDot', -1, 1, 0.01).onChange(requestRenderIfNotRequested);

function updateLabels() {
  if (!countryInfos) {
    return;
  }

-  const large = 20 * 20;
-  const maxVisibleDot = -0.2;
+  const large = settings.minArea * settings.minArea;
  // get a matrix that represents a relative orientation of the camera
  normalMatrix.getNormalMatrix(camera.matrixWorldInverse);
  // get the camera's position
  camera.getWorldPosition(cameraPosition);
  for (const countryInfo of countryInfos) {

    ...

    // if the orientation is not facing us hide it.
-    if (dot > maxVisibleDot) {
+    if (dot > settings.maxVisibleDot) {
      elem.style.display = 'none';
      continue;
    }
その結果が以下です。
回転させて地球儀の背面にいったラベルが消えるようになりました。
minVisibleDot を調整してカットオフの変化を見る事ができます。
また、minArea の値を調整して大きな国や小さな国を表示したりもできます。
このコード修正を通して、Googleマップにどれだけの労力が投入されているのかを実感しました。 Googleマップの開発者は、どのラベルを表示するかを決定しなければなりません。 色んな基準を使っているのは間違いないですね。 例えば、あなたの現在地、デフォルトの言語設定、アカウントを持っている場合はアカウントの設定、人口や人気度を使用している可能性、ビューの中央にある国を優先している可能性など。 考える事はたくさんあります。
これらの例がHTML要素を3Dに配置する方法について、あなたにいくつかのアイデアを与えられたと思います。 変更したい事がいくつかあります。
次は国を選んでハイライトするようにしてみましょう。